Labels

Saturday, December 17, 2011

how to install wordpress cms in backtrack

Companions may never want to install wordpress diBacktrack, but confused how to install it gmna, if diwindows may be easy ways installasinya pressing enter. The incident, too, who happen to my current web class because I had never done dilinux wordpress installation. But never is not a reason to stop, I searching kewebsite mysql and enlightened, the following WordPress tutorial install diBacktrack.

1. Run Apache and Mysql service from the Application> BackTrack> Services.
2. Download Wordpress here http://wordpress.org/download/
3. Extrack wordpress folder and copy it to / var / www
4. Create a database and make access to them.

root @ bt: ~ # mysql-u root-p
Enter a password:
Welcome to the MySQL monitor. Commands end with; or \ g.
Your MySQL connection id is 46
Server version: 5.1.41-3ubuntu12.10 (Ubuntu)

Type 'help;' or '\ h' for help. Type '\ c' to clear the current input statement.

mysql> CREATE DATABASE wordpress;
Query OK, 1 row affected (0.00 sec)

mysql> GRANT ALL PRIVILEGES ON *.* TO 'root' @ 'localhost' IDENTIFIED BY 'toor' WITH GRANT OPTION;
Query OK, 0 rows affected (0.00 sec)

mysql>


5. Open a browser and input the address localhost wordpress / wordpress


6. Database connection settings and click Submit.

Database Name: wordpress (or any database that we created dengna other names)
User Name: root
Password: toor
Database Host: localhost
Table Prefix: wp_


7. Open gedit and copy the text that is inside the box save it as wp-config.php in the folder / var / www / wordpress click Run the install.


8. Reopen the browser localhost / wordpress and fill the form.
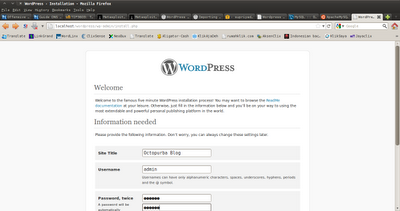


9. Ready to login.


Hopefully this tutorial to help friends who struggle to install wordpress diBacktrack, make friends who use OS other than backtrack tutorial can also apply.
Continue Reading »

Saturday, December 10, 2011

BackTrack Live USB Install

This method of getting a live install to a USB drive is the simplest available using Unetbootin. Note that we will format the USB drive and erase its contents.

Plug in your USB Drive (Minimum USB Drive capacity 2 GB)
Format the USB drive to FAT32
Download Unetbootin from http://unetbootin.sourceforge.net/
Start Unetbootin and select diskimage (use the backtrack-final ISO)
Select your USB drive and click “OK” for creating a bootable BackTrack USB drive
Log into BackTrack with the default username and password root / toor.

Continue Reading »

Friday, December 2, 2011

how to install virtual box on backtrack without error

Make friends who menggalami errors when installing Virtual Box on Backtrack 5, then try the following manner, ^ ^

1. Download Virtual Box here
2. Then Perform installation as below:

root @ bt: ~ / Downloads # ./VirtualBox-4.0.10-72479-Linux_x86.run
bash: ./VirtualBox-4.0.10-72479-Linux_x86.run: Permission denied
root @ bt: ~ / Downloads # chmod + x VirtualBox-4.0.10-72 479-Linux_x86.run
root @ bt: ~ / Downloads # ./VirtualBox-4.0.10-72479-Linux_x86.run
Verifying archive integrity ... All good.
Uncompressing VirtualBox for Linux installation ...........
VirtualBox Version 4.0.10 r72479 (2011-06-24T13: 43:27 Z) installer
Installing VirtualBox to / opt / VirtualBox
tar: Record size = 8 blocks
Python found: python bindings installing ...
Building the VirtualBox kernel modules

VirtualBox has been installed successfully.

Will you find useful information about using VirtualBox in the user manual
   / opt / VirtualBox / UserManual.pdf
and in the user FAQ
   http://www.virtualbox.org/wiki/User_FAQ

We Hope that you enjoy using VirtualBox.

good luck...
Continue Reading »

Thursday, December 1, 2011

How to install postgresql in backtrack

Some of the companions may have heard about db_autopwn which typically uses postgresql as the database to perform the attack exploits, excessive use menggurangi db_autopwn is that we can use the time to carry out attacks.

root @ bt: ~ # apt-get install ruby libpgsql postgresql-libpq-dev
root @ bt: ~ # su postgres
sh-4.1 $ createuser root-P
Could not change directory to "/ root"
Enter password for new role:
Enter it again:
Shall the new role be a superuser? (y / n) n
Shall the new role be allowed to create databases? (y / n) n
Shall the new role be allowed to create more new roles? (y / n) n
sh-4.1 $ createdb - owner = root metasploit
Could not change directory to "/ root"
exit
sh-4.1 $ exit
exit

selamat mencoba..
Continue Reading »

Sunday, November 20, 2011

How to install phpmyadmin in linux

This time I will explain how to install phpmyadmin on linux. Here are the steps:

1. $ Su -
2. # Cd / var / www / html
3. # Wget-c http://prdownloads.sourceforge.net/phpmyadmin/ phpMyAdmin-2.11.3-english.tar.gz? Download
4. # Tar xvfz phpMyAdmin-2.11.3-english.tar.gz
5. # Mv phpMyAdmin-2.11.3-bahasa phpmyadmin
6. # Cd phpmyadmin
7. # Cp config.inc.php config.sample.inc.php
8. # Vi config.inc.php: $ cfg ['Servers'] [$ i] ['auth_type'] = 'http'; # default is cookies:
9. # Service httpd restart...
Continue Reading »

how to install the synaptic package manager in backtrack

Make new friends and regular use ubuntu, it may be difficult to manage applications in backtrack, therefore the application needed to manage it like diubuntu, for example, Synaptic Package Manager or Ubuntu Software Center. So we now will do the installation on the second application on our Backtrack.

1. Install Synaptic Package Manager.
root @ bt: ~ # apt-get install synaptic


Display Synaptic Package Manager on Backtrack 5 R1.


2. Go to System> Administration> Software Sources, on the Ubuntu Software tab check all the options of Downloadable from the Internet.


3. Install Ubuntu Software Center.
root @ bt: ~ # apt-get install software-center

Ubuntu Software Center on Backtrack 5 R1.


good luck
Continue Reading »

Sunday, November 13, 2011

How to run webgoat 5.3 standard on BT4

hi all,

this is not a real howto but some hints to let you play with WebGoat in BT4.

First download webgoat from this link and visit the OWASP WebGoat pages for more info about WebGoat.

Next you have to install p7zip to extract the archive, you can do this with the apt package manager from console running

apt-get install p7zip

and then extract the archive using

p7zip -d WebGoat-OWASP_Standard-5.3_RC1.7z

You can leave it in your root folder but if you like "clean desktops" move it inside /pentest/web/webgoat, you can do this from terminal with

mkdir /pentest/web/webgoat
mv WebGoat-5.3_RC1/* /pentest/web/webgoat

now make /pentest/web/webgoat/webgoat.sh executable with

chmod +x /pentest/web/webgoat/webgoat.sh

and then install openjdk-6-jre and openjdk-6-jdk with apt:

apt-get install openjdk-6-jre openjdk-6-jdk

Now you can run webgoat on port 80 or 8080 running

sh /pentest/web/webgoat/webgoat.sh start80 or sh /pentest/web/webgoat/webgoat.sh start8080

and to stop tomcat and webgoat use

sh /pentest/web/webgoat/webgoat.sh stop

Open up firefox and connect to http://127.0.0.1/webgoat/attack or http://127.0.0.1:8080/webgoat/attack according to the port you use to run tomcat. the username and password are both guest.

OWASP provide some intresting readings, you can find them on OWASP wiki and on the books page.

Hope this helps noobs like me who want to learn something about webapp security.

Continue Reading »