Labels

Showing posts with label backtrack. Show all posts

Saturday, December 17, 2011

how to install wordpress cms in backtrack

Companions may never want to install wordpress diBacktrack, but confused how to install it gmna, if diwindows may be easy ways installasinya pressing enter. The incident, too, who happen to my current web class because I had never done dilinux wordpress installation. But never is not a reason to stop, I searching kewebsite mysql and enlightened, the following WordPress tutorial install diBacktrack.

1. Run Apache and Mysql service from the Application> BackTrack> Services.
2. Download Wordpress here http://wordpress.org/download/
3. Extrack wordpress folder and copy it to / var / www
4. Create a database and make access to them.

root @ bt: ~ # mysql-u root-p
Enter a password:
Welcome to the MySQL monitor. Commands end with; or \ g.
Your MySQL connection id is 46
Server version: 5.1.41-3ubuntu12.10 (Ubuntu)

Type 'help;' or '\ h' for help. Type '\ c' to clear the current input statement.

mysql> CREATE DATABASE wordpress;
Query OK, 1 row affected (0.00 sec)

mysql> GRANT ALL PRIVILEGES ON *.* TO 'root' @ 'localhost' IDENTIFIED BY 'toor' WITH GRANT OPTION;
Query OK, 0 rows affected (0.00 sec)

mysql>


5. Open a browser and input the address localhost wordpress / wordpress


6. Database connection settings and click Submit.

Database Name: wordpress (or any database that we created dengna other names)
User Name: root
Password: toor
Database Host: localhost
Table Prefix: wp_


7. Open gedit and copy the text that is inside the box save it as wp-config.php in the folder / var / www / wordpress click Run the install.


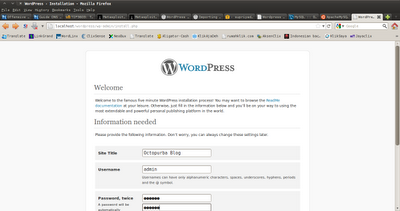
8. Reopen the browser localhost / wordpress and fill the form.


9. Ready to login.


Hopefully this tutorial to help friends who struggle to install wordpress diBacktrack, make friends who use OS other than backtrack tutorial can also apply.
Continue Reading »

Saturday, December 10, 2011

BackTrack Live USB Install

This method of getting a live install to a USB drive is the simplest available using Unetbootin. Note that we will format the USB drive and erase its contents.

Plug in your USB Drive (Minimum USB Drive capacity 2 GB)
Format the USB drive to FAT32
Download Unetbootin from http://unetbootin.sourceforge.net/
Start Unetbootin and select diskimage (use the backtrack-final ISO)
Select your USB drive and click “OK” for creating a bootable BackTrack USB drive
Log into BackTrack with the default username and password root / toor.

Continue Reading »

Friday, December 2, 2011

how to install virtual box on backtrack without error

Make friends who menggalami errors when installing Virtual Box on Backtrack 5, then try the following manner, ^ ^

1. Download Virtual Box here
2. Then Perform installation as below:

root @ bt: ~ / Downloads # ./VirtualBox-4.0.10-72479-Linux_x86.run
bash: ./VirtualBox-4.0.10-72479-Linux_x86.run: Permission denied
root @ bt: ~ / Downloads # chmod + x VirtualBox-4.0.10-72 479-Linux_x86.run
root @ bt: ~ / Downloads # ./VirtualBox-4.0.10-72479-Linux_x86.run
Verifying archive integrity ... All good.
Uncompressing VirtualBox for Linux installation ...........
VirtualBox Version 4.0.10 r72479 (2011-06-24T13: 43:27 Z) installer
Installing VirtualBox to / opt / VirtualBox
tar: Record size = 8 blocks
Python found: python bindings installing ...
Building the VirtualBox kernel modules

VirtualBox has been installed successfully.

Will you find useful information about using VirtualBox in the user manual
   / opt / VirtualBox / UserManual.pdf
and in the user FAQ
   http://www.virtualbox.org/wiki/User_FAQ

We Hope that you enjoy using VirtualBox.

good luck...
Continue Reading »

Thursday, December 1, 2011

How to install postgresql in backtrack

Some of the companions may have heard about db_autopwn which typically uses postgresql as the database to perform the attack exploits, excessive use menggurangi db_autopwn is that we can use the time to carry out attacks.

root @ bt: ~ # apt-get install ruby libpgsql postgresql-libpq-dev
root @ bt: ~ # su postgres
sh-4.1 $ createuser root-P
Could not change directory to "/ root"
Enter password for new role:
Enter it again:
Shall the new role be a superuser? (y / n) n
Shall the new role be allowed to create databases? (y / n) n
Shall the new role be allowed to create more new roles? (y / n) n
sh-4.1 $ createdb - owner = root metasploit
Could not change directory to "/ root"
exit
sh-4.1 $ exit
exit

selamat mencoba..
Continue Reading »

Sunday, November 20, 2011

how to install the synaptic package manager in backtrack

Make new friends and regular use ubuntu, it may be difficult to manage applications in backtrack, therefore the application needed to manage it like diubuntu, for example, Synaptic Package Manager or Ubuntu Software Center. So we now will do the installation on the second application on our Backtrack.

1. Install Synaptic Package Manager.
root @ bt: ~ # apt-get install synaptic


Display Synaptic Package Manager on Backtrack 5 R1.


2. Go to System> Administration> Software Sources, on the Ubuntu Software tab check all the options of Downloadable from the Internet.


3. Install Ubuntu Software Center.
root @ bt: ~ # apt-get install software-center

Ubuntu Software Center on Backtrack 5 R1.


good luck
Continue Reading »

Sunday, November 13, 2011

How to run webgoat 5.3 standard on BT4

hi all,

this is not a real howto but some hints to let you play with WebGoat in BT4.

First download webgoat from this link and visit the OWASP WebGoat pages for more info about WebGoat.

Next you have to install p7zip to extract the archive, you can do this with the apt package manager from console running

apt-get install p7zip

and then extract the archive using

p7zip -d WebGoat-OWASP_Standard-5.3_RC1.7z

You can leave it in your root folder but if you like "clean desktops" move it inside /pentest/web/webgoat, you can do this from terminal with

mkdir /pentest/web/webgoat
mv WebGoat-5.3_RC1/* /pentest/web/webgoat

now make /pentest/web/webgoat/webgoat.sh executable with

chmod +x /pentest/web/webgoat/webgoat.sh

and then install openjdk-6-jre and openjdk-6-jdk with apt:

apt-get install openjdk-6-jre openjdk-6-jdk

Now you can run webgoat on port 80 or 8080 running

sh /pentest/web/webgoat/webgoat.sh start80 or sh /pentest/web/webgoat/webgoat.sh start8080

and to stop tomcat and webgoat use

sh /pentest/web/webgoat/webgoat.sh stop

Open up firefox and connect to http://127.0.0.1/webgoat/attack or http://127.0.0.1:8080/webgoat/attack according to the port you use to run tomcat. the username and password are both guest.

OWASP provide some intresting readings, you can find them on OWASP wiki and on the books page.

Hope this helps noobs like me who want to learn something about webapp security.

Continue Reading »

Saturday, November 12, 2011

How to using latest Sun Java JRE

1. download latest JRE
Download Java software for Linux
Linux (self-extracting file)

2.
Code:
 mkdir /opt/java && cd /opt/java && sh /xx/xx/{your downloaded xx.bin file}
(will create: /opt/java/jre1.6.0_21)


3.
Code:
 update-alternatives --install "/usr/bin/java" "java" "/opt/java/jre1.6.0_21/bin/java" 1

4.
Code:
 update-alternatives --set java /opt/java/jre1.6.0_21/bin/java

5.
Code:
 ln -s /opt/java/jre1.6.0_21/lib/i386/libnpjp2.so /usr/lib/mozilla/plugins/
Note: don't use /opt/java/jre1.6.0_21/plugin/i386/ns7/xxx.so


6. add JAVA_HOME to your bash environment, like
export JAVA_HOME=" /opt/java/jre1.6.0_21/bin/java"
into (~/.bashrc)


test if correct java JRE is in use:
Code:
 java -version
7. restart firefox and new java plugin should be available
about:plugins

/brtw2003
Continue Reading »

Friday, November 11, 2011

Getting BROADCOM Wireless to work in BackTrack!

So you are new to BackTrack and your wireless doesn't work out of the box?

No problem!

There are several ways to solve this problem and I'll show you two ways!

All this ways requires that you have a ethernet connection ( a wired connection ).

BEFORE YOU TRY THESE, MAKE SURE YOU'VE RAN APT-GET INSTALL UPGRADE & APT-GET INSTALL UPDATE BEFORE IF YOU ARE RUNNING BACKTRACK 4 FINAL - IT'S ALWAYS GOOD TO UPGRADE.

Using jockey-gtk
This is the most simple one.

Log into BackTrack as root and run these commands:

Code:
/etc/init.d/networking start
apt-get install jockey-gtk
jockey-gtk

Then follow the instructions on the program that starts.


Downloading drivers manually
Go to: Broadcom.com - 802.11 Linux STA driver
And download the tarball for your system (32 or 64).

Run the following in the terminal:

Code:
/etc/init.d/networking start
tar xzf nameoffile.tar.gz

cd thefolderyouget
make clean
make
Now let's check if you have any conflicting drivers (you shouldn't, they doesn't come with BT.)

Code:
lsmod  | grep "b43\|ssb\|wl"

If any of these are installed, remove them:
rmmod b43
rmmod ssb
rmmod wl

Then let's insmod the driver:


Code:
modprobe lib80211
insmod wl.ko
Congratulations! You are up and running!


Note: You maybe have to start network through the KDE "start menu" before you get the WICD manager up, then you should see networks.

If you can't connect to a wireless network, try changing WPA supplicant driver.
Continue Reading »

Thursday, October 27, 2011

How to Start Networking in Backtrack

This is always a huge topic and it seems simple to many of us but the fact of the matter is we have a lot of "new" people so we need to be clear about this sort of thing. (Note all commands should be run as root or with sudo)

1. To start networking in Backtrack 4 final issue the following command.

/etc/init.d/networking start

This will attempt to start all the interfaces in the /etc/network/interfaces file.

root@bt:~# cat /etc/network/interfaces
auto lo
iface lo inet loopback

auto eth0
iface eth0 inet dhcp

auto eth1
iface eth1 inet dhcp

auto eth2
iface eth2 inet dhcp

auto ath0
iface ath0 inet dhcp

auto wlan0
iface wlan0 inet dhcp


If you don't have or don't want some of these interfaces then simply remove the from this file and they will not start.

If you need to set a static IP just set the variables in the /etc/network/interfaces file

auto eth0
iface eth0 inet static
address 192.168.0.100
netmask 255.255.255.0
network 192.168.0.0
broadcast 192.168.0.255
gateway 192.168.0.1

You will also need to make sure you set a nameserver in /etc/resolv.conf

root@bt:~# cat /etc/resolv.conf
nameserver 192.168.0.1


So for example if all you have is eth0 and wlan0 on your system and you want them both to get a adress via DHCP then remove every thing else for the file with the exception of the lo interface. Here is a example.

root@bt:~# cat /etc/network/interfaces
auto lo
iface lo inet loopback

auto eth0
iface eth0 inet dhcp

auto wlan0
iface wlan0 inet dhcp


Now if are lazy and want all this to start at boot you can simply issue this command as root

update-rc.d networking defaults

This will create all the proper sym-links

What about ssh?

So while I am on the subject I may as well go over ssh. In order to use ssh on backtrack 4 final you need to generate the keys first.

sshd-generate

after that you can start ssh like this:

/etc/init.d/ssh start


or you can add it to the boot sequence like this:

update-rc.d ssh defaults

Well thats enough to get up and running. I hope this was somewhat helpful to any one just getting started with backtrack.
Continue Reading »

Tuesday, October 25, 2011

Install BackTrack in VMWare.

Follow the basic install instructions here to get BackTrack installed in a VMware machine.
Log into BackTrack. To install the VMWare drivers, the kernel source and headers need to be in place. By default in the BackTrack 4 final release, the kernel (denoted by {version} ) is configured and ready. However in some cases, you might need to make sure you have the latest kernel sources by typing in:
apt-get update apt-get install linux-source cd /usr/src tar jxpf linux-source-{version}.tar.bz2 ln -s linux-source-{version} linux cd linux zcat /proc/config.gz > .config make scripts make prepare

Now that your kernel sources and headers are in place, run the “Install VMWare tools” for the specific guest VM.
Mount the VMWare tools virtual cd, copy over the VMWare tools package and run the installer:
mount /dev/cdrom3 /mnt/cdrom cp /mnt/cdrom/VMwareTools-{version}.tar.gz /tmp/ cd /tmp/ tar zxpf VMwareTools-{version}.tar.gz cd vmware-tools-distrib ./vmware-install.pl

Complete the VMWare tools installation as required. Run “fix-splash” to reintroduce the green framebuffer console. Reboot.

Continue Reading »

Monday, October 24, 2011

BackTrack Clean Hard Drive Install

This method of installation is the simplest available. The assumption is that the whole hard drive is going to be used for BackTrack.

1. Boot BackTrack on the machine to be installed. Once booted, type in “startx” to get to the KDE graphical
    interface.
2. Double click the “install.sh” script on the desktop, or run the command “ubiquity” in console.


3. Select your geographical location and click “forward”.  Same for the Keyboard layout.
4. The next screen allows you to configure the partitioning layout. The assumption is that we are deleting the 
    whole drive and installing BackTrack 


5. Accept the installation summary and client “Install”. Allow the installation to run and complete. Restart 
    when done.


6. Log into BackTrack with the default username and password root / toor. Change root password.
7. Fix the framebuffer splash by typing “fix-splash” ( or “fix-splash800? if you wish a 800×600 framebuffer), 
     reboot.
Continue Reading »